Simplest DIY backpacking/emergency
hiking stove
In my desire for better emergency equipment, I wanted a folding stove. I’ve built a couple of different models in the past, but they had some limitations. I wanted a stove that could use Esbit or Coughlan's hexamine tablets, military-style diethylene glycol gel, a can of Sterno, a candle, or sticks and twigs (sometimes called biofuel).
I wanted something I can build myself using common tools and parts I can purchase locally, at Lowe’s or Home Depot. I’ve seen videos of people building stoves using CNC machines, but those videos, while interesting, are useless to anyone who doesn’t, well, own a CNC machine. A lot of DIY designs try to duplicate the commercial products by cutting slots into steel and making something that snaps together. I didn’t want any of that, they just look too flimsy and hard to make with common tools.
I didn’t want a stove that requires a tin can to be repurposed, as those get bent easily and are really suitable mostly for situations where you are taking a large pack with a lot of space. I wanted something that folds flat and will fit into a small pack or sling bag. It could be used for a multi-day hike, but I really only expect to use it if something bad happens.
My last requirement is that I need to be able to set my water bottle on it. I carry an uninsulated stainless steel water bottle, and I want to be able to melt snow or boil water with the stove.
Here are complete instructions for building the stove, with a couple of optional additions.
Parts needed:
3x 3x5 steel nail plates (for sides and fuel plate)
30" of 14-16ga steel wire or 8x 3" long steel garden staples or 30" of 10-12ga copper wire.
12" of 3/16" diameter brass tubing
12" 6-32 threaded steel rod
6x 6-32 wingnuts
Optional: 3x7" nail plate
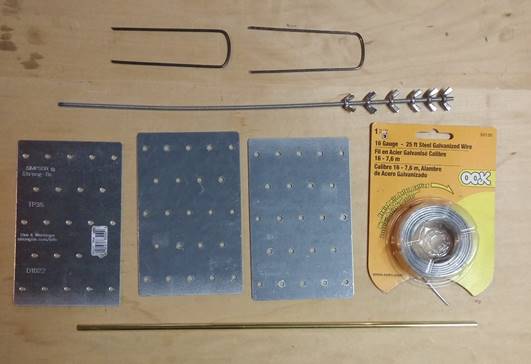
Figure 1- All the parts needed for the stove. A spool of steel wire is shown to the right, two garden stakes at the top. Use either steel wire, 6 garden stakes, or 10-12ga copper wire.
Tools needed:
Pliers with wire cutter
Flat or half-round file
Drill press or hand drill (you can use a manual egg-beater style drill, but it's more work)
Pipe cutter (hacksaw will also work)
9/64" drill bit
Automatic center punch (not required, but makes the drilling easier)
Instructions:
1. Cut three 3.2" length pieces from the brass tubing (use 3 1/4" if you don't have a decimal ruler) Discard the short leftover piece.
2. Cut the 12" 6-32 rod into three equal 4" pieces. File the ends so you can thread a wingnut onto them.
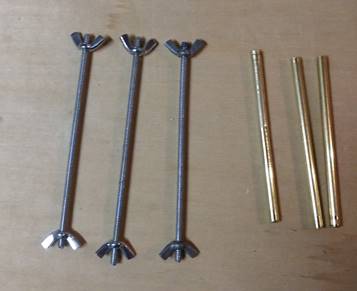
Figure 2- Brass tubes and threaded rods, cut from 12" pieces.
3. On two of the nail plates, along the long side, draw a line along the centers of the three middle holes. 1" from each side of the middle hole, mark and drill a 9/16" hole (two holes per nail plate). The side with the added holes is the top of the side plates.
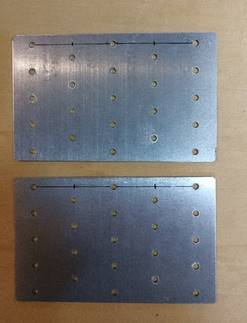
Figure 3- Side plates, marked for drilling.
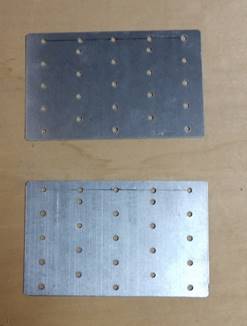
Figure 4 - Side plates, drilled as marked.
4. Put a wingnut on one end of each of the 6-32 rods. On the bottom edge of one plate, thread the rod through the middle hole, then through the brass tube, then through the matching hole on the other plate, then put a wingnut on that end. Repeat with top corner holes of the other plates. Tighten wingnuts. This is the basic frame.
Figure 5 - Basic frame, assembled.
4. Using the steel wire (if using garden stakes, bend them as flat as you can), cut six 4.5" pieces of wire.
5. About 3/8" from one end of each piece, bend a right angle.
Figure 6 - Support rods. These are made from 10ga copper wire.
6. Three of the rods are inserted through the middle three holes of the top of the frame (the original middle hole and the two new holes). This is the base where you would set a steel water bottle or a tin can. For a larger container, the rods aren't needed, it can just rest on the top of the frame.
7. The other two rods are inserted into the lower holes to hold the fuel plate. For a small can of Sterno, you would use the bottom holes. For sticks and twigs, you would use the next set of holes. For hexamine tables or diethylene glycol gel, you would use the third set of holes from the bottom. See the picture. The sixth rod is a spare.
Figure 7 - Where to place the fuel plate support rods for different fuels.
8. The fuel plate is the third nail plate. For less weight, you could substitute a 3" x 5" piece of 0.050" aluminum for the fuel plate.
Optional: cut a 3x7 nail plate into two 3 x 3 1/2" pieces. You can lean these against the open ends to improve the efficiency of the stove. You can also attach these end plates to the sides with hinges, which I did with mine. Hinges are 1” brass (they were on sale at Lowe’s) and attached with 4-40 flat countersunk screws and 4-40 Keps™ nuts (also known as K-lock nuts).

Figure 8 - Assembled unit with hinged end panels added. You can see the top support rods for a water bottle or tin can and the end plates swung partly open..
Figure 9 - Completed stove, folded flat.
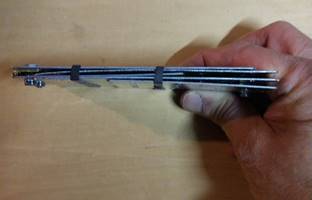
Figure 10 - Folded flat, end view, to show thickness. It's a little thinner if you don't hinge the end panels.
Note: If you cut the brass tubing a little bit short, the fit will be too tight to slide the fuel plate into place. You can fix this by using tin snips to trim about 1/16" off the long side of the fuel plate.
The complete folded stove fits into one of those 7”x6” zippered pouches made by CLC.