Warning: "continue" targeting switch is equivalent to "break". Did you mean to use "continue 2"? in /hermes/bosnacweb04/bosnacweb04ao/b2673/ipg.stuart65/SurvivalBlog/wp-includes/pomo/plural-forms.php on line 210 Hiking Survival – Surviving when you get lost while hiking
I want to tie up a few loose ends here. The first one is the subject of fatwood. As I mentioned in an earlier post, fatwood is pine wood, usually from a stump, that is saturated with pine resin. I bought a box from a local ranch supply store (Murdoch’s) for about $4. It is marketed as a firestarter for fireplaces, wood stoves, and similar applications. The one I bought is marketed by fatwood.com. Walmart sells the Duraflame equivalent, although the box they sell is quite a bit larger – more than I wanted.
You can purchase small pieces of fatwood in a metal tin that are specifically for camping and emergency fires, but it’s easy to buy the $4 box and split the pieces to make enough emergency tinder for you and all your friends, and probably all their friends.
Probably the best way to light a fatwood tinder stick with a ferrorcerium rod is to make a “feather stick”, as shown below. I broke one of the sticks from the box in half and then carefully shaved “feathers” of wood so that they curled up and made a kind of “fuzzy” stick.
You can do the same thing with any wood that you want to light, but it works really well with fatwood because the resin lets the sticks catch fire easier. If you try this with a sliver from a 2×4 or some random stick you pick up off the ground, the feathers will tend to smolder rather than catch fire. You can light a feather stick from about any piece of dry wood, but it’s a lot easier if the wood is fatwood.
You can also shave the feathers off and make a little pile of them. But leaving them attached to the fatwood will keep them in place if it’s windy. If you are carrying really small pieces of fatwood (or if you carve them out of a tree in an emergency) it may not be practical to make the feather stick; just shave tiny pieces off, make a small pile, and light them.
I’ve also lit fatwood by just breaking a piece in half and lighting the exposed, ragged end. It takes a little work, but it’s possible to do. Of course, you can also light fatwood with a match or a lighter.
You can also use larger feather sticks to light with a match or lighter. But unless you’ve got a pile of large logs and no smaller tinder (very unlikely) it’s probably more work than it’s worth most of the time. In most cases, if you have a knife to make the feather stick, it would be easier to just split some kindling-sized pieces off the larger pieces.
In the post on emergency tinder, I mentioned using lip balm as a fuel to extend the burn time of a piece of cloth or tissue. Here is a picture of a little Carmex squeezed from a tube onto a piece of a tissue. I worked the Carmex into the tissue and then lit one edge with a ferrocerium rod. This amount of Carmex burned about a minute and a half.
A blob of Purell Advanced hand sanitizer about the size of a quarter also burned for about a minute and a half. Of course, one advantage of hand sanitizer is that you can smear it on the wood you are trying to light.
A single alcohol hand sanitizer sterile wipe burned for less than 30 seconds. You would want to use this with some other tinder like dry grass, dry leaves, or dry pine needles. You could also use it to light a tiny pile of very small wood slivers, which could then light a more reasonable-sized kindling pile.
That’s it, I don’t have any more to say about lighting fires. Post comments if you have suggestions.
When I hike in the mountains, I carry a small pack with a kit of fire-making items, and a smaller, pocket-sized kit. The photo below shows the pocket case I mentioned in an earlier post, with the contents. There is a ferrocerium rod with scissors blade as a striker, jute twine tinder, a balloon tied shut with five waterproof matches inside, and a brass tube of lighter fluid. The matches in the balloon are waterproof, but the striker is not, so it’s all in the balloon to make it waterproof. I chose the bright orange balloon for visibility. The case is made of canvas so I could burn it in a real emergency.
METADATA-START
Here is a smaller pocket kit. The case is a length of tubular nylon webbing, sewn at the bottom and with the top cut and folded to make a foldover snap closure. You are limited by the capacity of the webbing, so it holds less. No matches in this case, but it has the ferrocerium rod, some short pieces of wax-dipped jute, wrapped in waxed paper (the waxed paper can be used as tinder), two of the larger jute-and-tissue tinders, and a tube of lighter fluid. Another piece of folded waxed paper is tucked in behind the smaller jute tinders, just because it folds flat and doesn’t take much space. You won’t be using the case as tinder since it’s nylon, but it is a visible red color
.METADATA-START
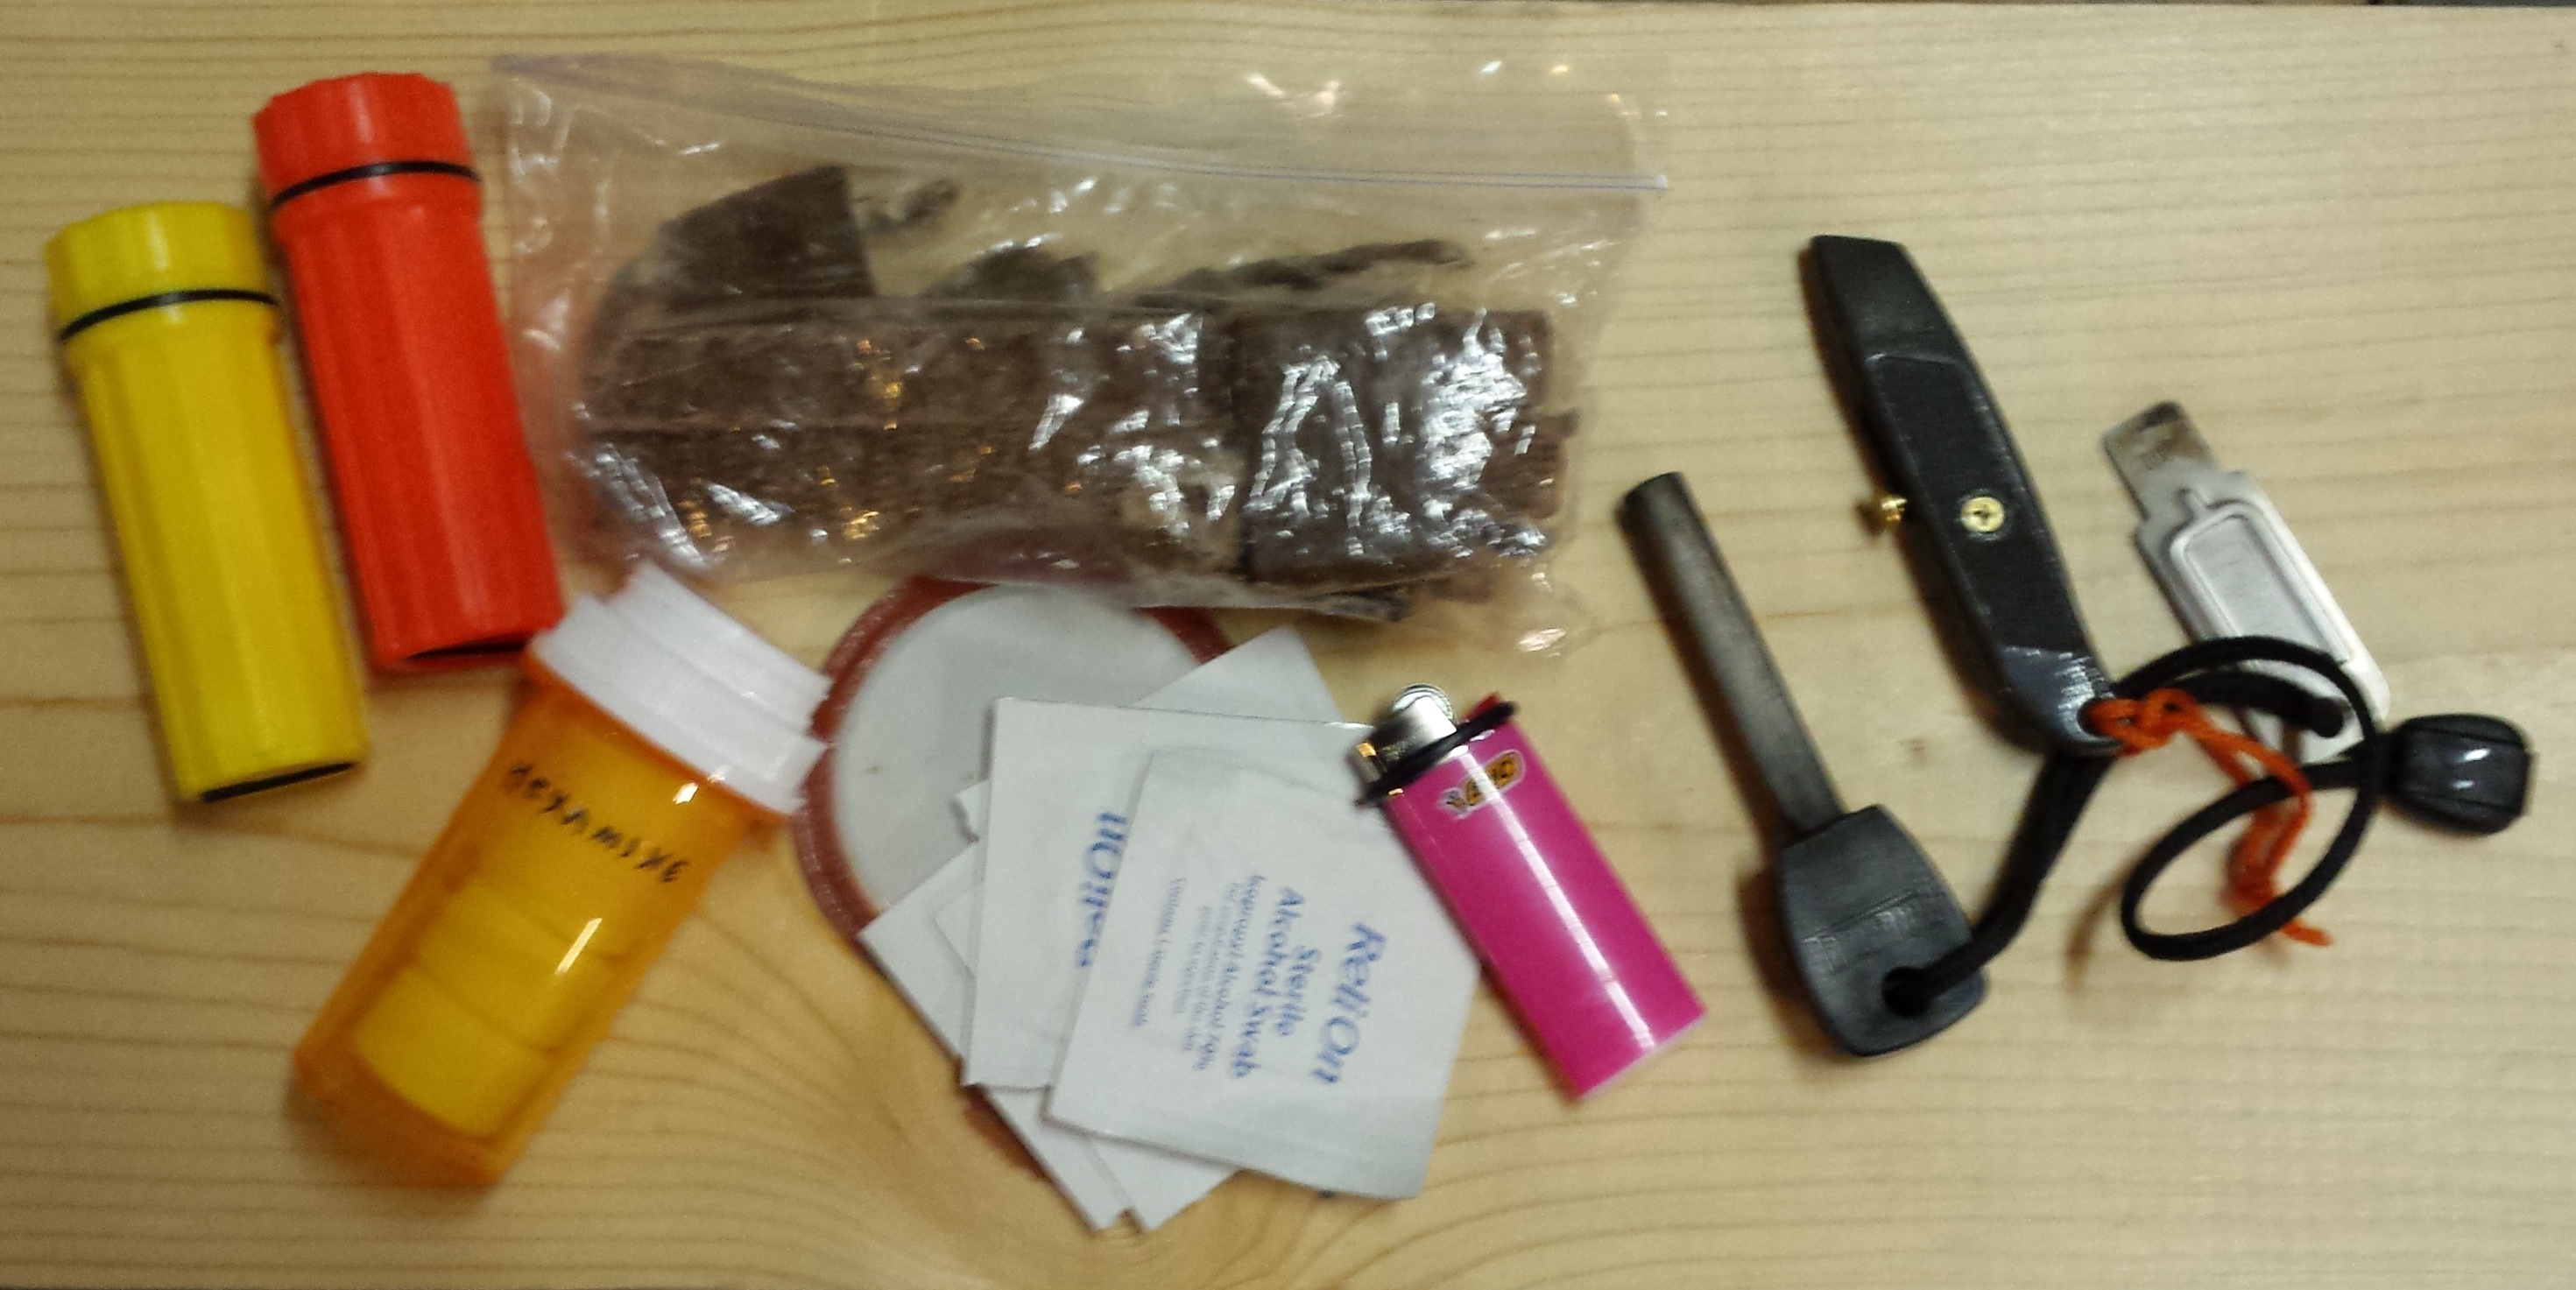
Finally, here is the larger kit that is in my pack. The orange waterproof match case contains matches and has an Exotac striker strip on the inside of the lid. The yellow case has some Zippo waxed tinder sticks. The Ziploc bag has two Coghlan’s firesticks and some wax-dipped jute-and-cardboard tinder. The pill bottle contains four Coglan’s hexamine tablets. There is a canning jar lid to provide a flat, dry surface to light tinder, and some alcohol wipes. A Bic lighter and a Swedish Firesteel ferrocerium rod complete the kit. There is a mini utility knife for the Firesteel, as well as the original striker that came with it. This all goes in a zippered cloth bag.
METADATA-START
You could make this smaller by discarding the Zippo tinders or the plastic bag with the Coghlan’s firesticks and the jute tinders. It’s really unlikely that in a lost hiker situation you would need both. You could shrink it more by discarding the waterproof match case, which holds something like 20 matches, and replacing it with some matches in a balloon, like in the first pocket kit I described. It’s all a matter of trading off what you are willing to carry against what you might need if you get lost. I’m still tinkering with what I carry, and I may replace some of these items with fatwood tinder or pack less of something. I don’t like the pill bottle for the hexamine tablets since it is larger than the waterproof cases for the matches and Zippo sticks. But unless I crush the hexamine to powder, the tablets won’t fit in anything much smaller. I don’t want to discard the hexamine entirely as I can use it to boil water or melt snow using my stove.
If you don’t want to take a pack when you go on short hikes, or you just think all the stuff in the larger kit is overkill, the first pocket kit I described would be adequate for most situations. As long as you can find dry wood, you can start a fire, multiple times, with what is in that kit.
Having fire-starting tools is good, but there is some skill in making a fire. People who camp all the time, cooking with wood fires, will find this elementary. But a lot of day hikers have never started any fire except maybe in their charcoal grill – with half a cup of lighter fluid.
If you get lost while hiking, you will have to build a fire with what you can find. There won’t be any pre-split firewood, cured and dried and ready to light. The wood you find on the ground may be damp, especially in snowy conditions. The amount of wood you need to keep you warm all night seems ridiculously huge.
A successful fire needs two things: fuel and air. It is entirely possible to have plenty of wood to keep you warm, but to stack it so that it can’t get enough air to keep burning.
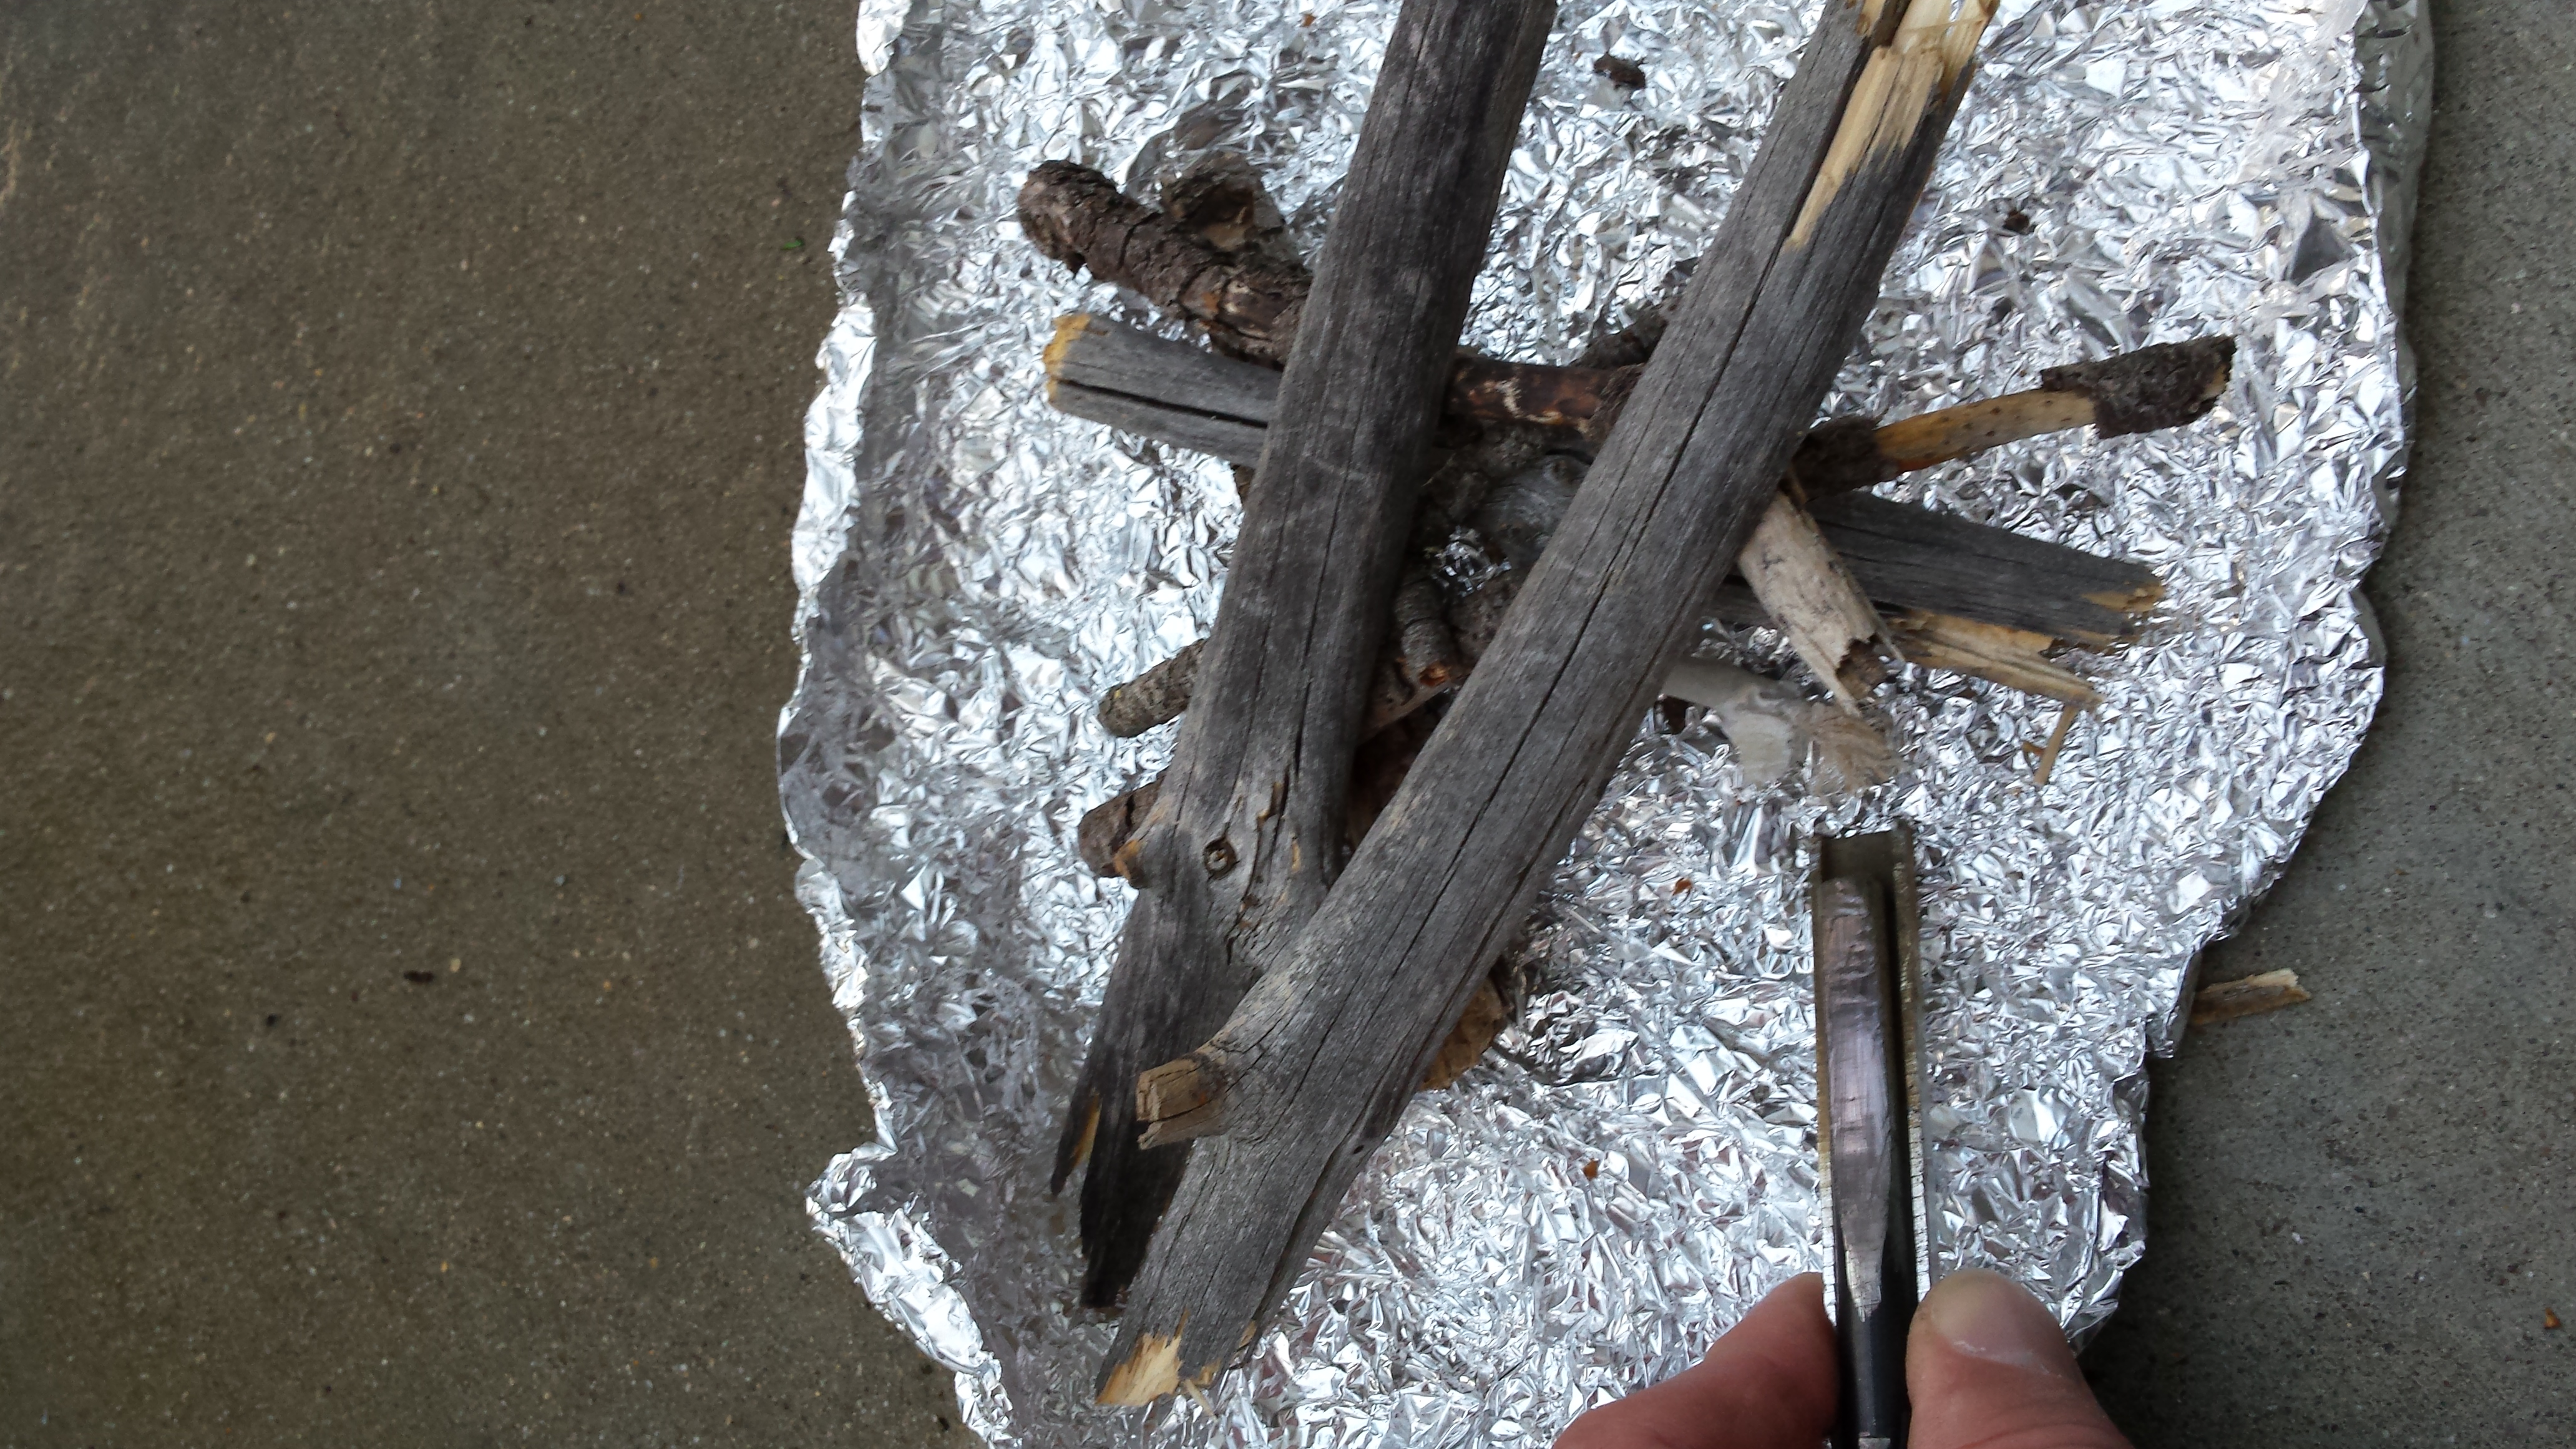
To illustrate making a fire with the jute-and-tissue kindling, I made a fire on my back porch. I built it on aluminum foil, both to keep from leaving black ash all over the concrete, and to provide some contrast.
The fire in the picture was built with some small pieces I picked up to use for kindling. They were about 4” to 8” long, and the diameter ranged from about that of a pencil to that of a dime. The two larger pieces were from a dead sapling or tree branch that I found; I broke off about 10” of the small end and split it with a knife so it would burn better. This is an important idea; if you find a dead sapling or branch, you may be able to get two or three graduated sizes of kindling from the same piece of wood. I split this piece of wood with a pocket knife by working the knife down the wood until it split into two pieces. You could use a knife as a wedge and hammer it with a rock. Just don’t try to split a large piece of wood this way; you’ll break the knife.
If you look closely in the picture, you can see the jute-and-tissue kindling piece with the fibers on one end pulled apart and separated to catch a spark. I only had to scrape the ferrocerium rod twice to catch this on fire. This small fire burned for about ten minutes.
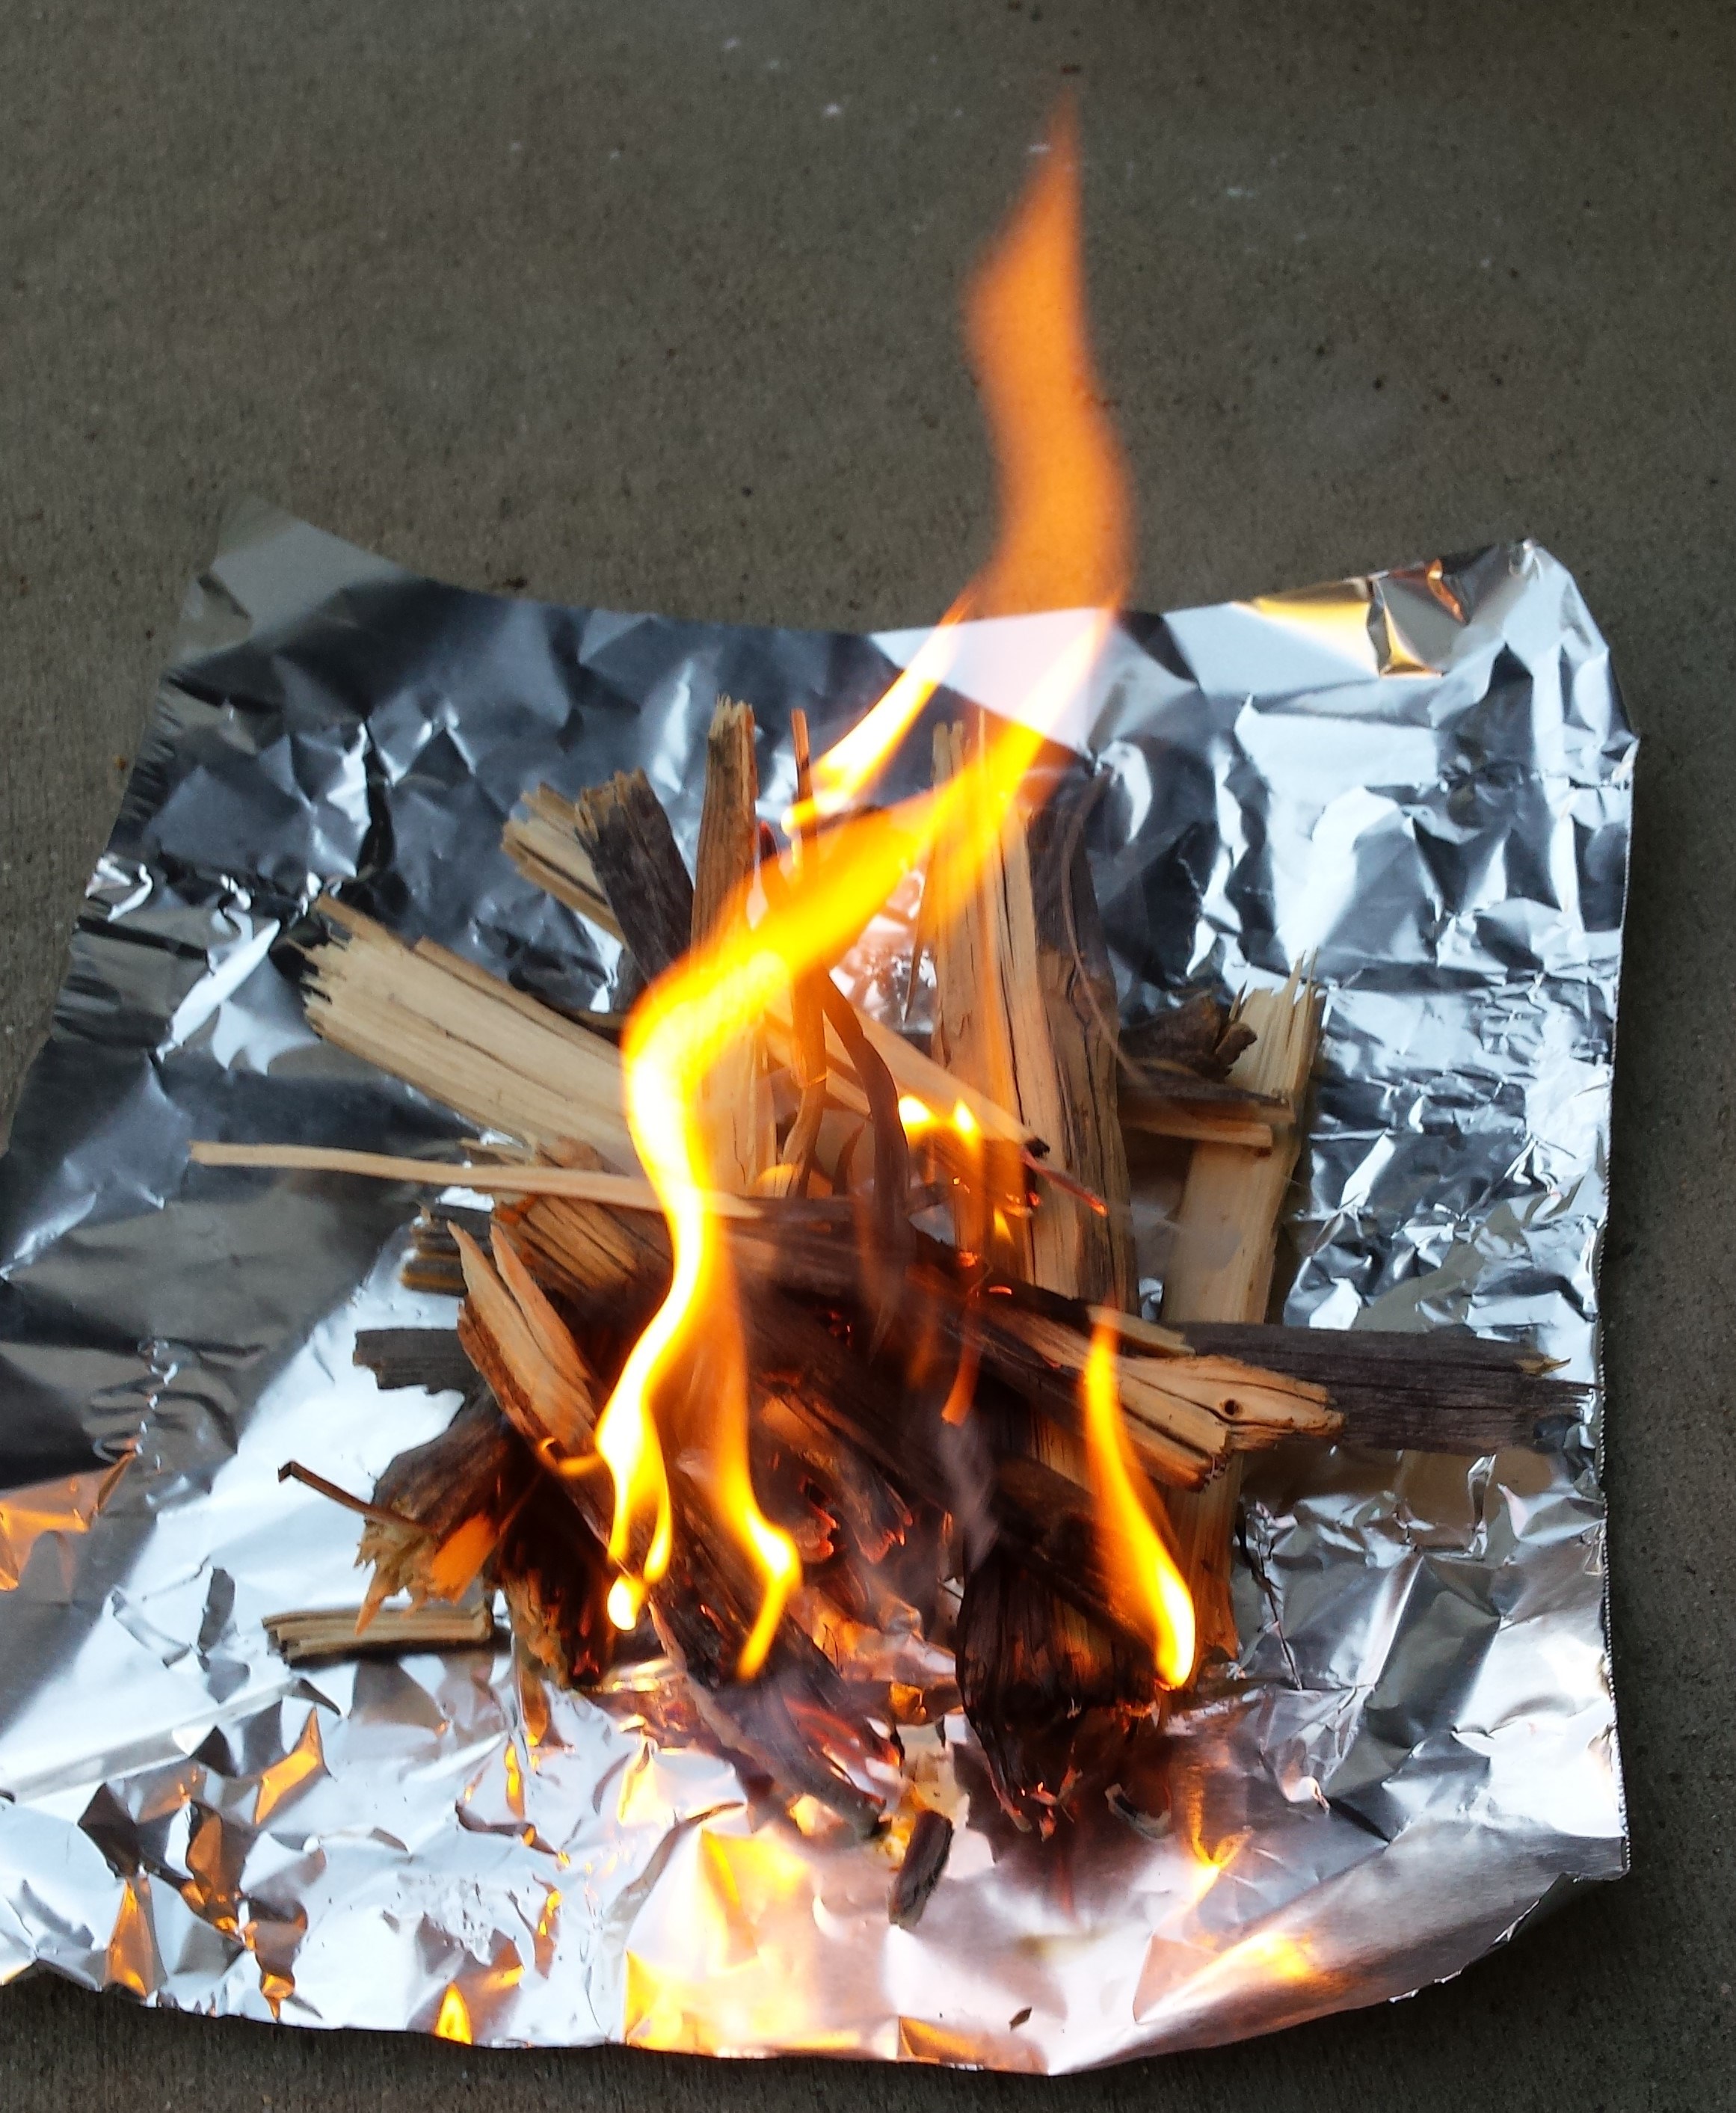
There are a couple of different ways to make a fire like this, one is to build a pyramid of kindling over a pile of tinder. That works, and it’s what I did at Brainard Lake, but it’s a little more complicated since you have to find pieces of approximately equal length to make the structure. The fire I lit here was just a mixture of small and large sticks, stacked so they would feed each other and so that there would be good airflow around them.
In a real survival situation, you would use a fire like this to ignite the larger wood that you are going to use for all-night fuel. You could build a pyramid of larger sticks (think dime-sized) over this before you light it. Or you can make a “log cabin” of sticks with this kindling fire in the middle. You can even just build a pile of sticks over this fire once it’s burning well, adding them two at a time.
METADATA-STARTMETADATA-START
These picture are of a “log cabin” that I lit with a couple of small sticks. The tips of the sticks were prepared with a few drops of lighter fluid (see the section on Chemical Tinder in the second post). For the picture, I used a green pen to show how the tinder sticks were inserted to the kindling pile. You want the sticks as vertical as possible, but the tip with the lighter fluid has to be exposed so you can light it.
Notice that the kindling structure isn’t very even. The idea of the log cabin structure is to have space between the kindling pieces so air can flow through them. But you obviously aren’t going to have kindling pieces that are all the same size. Like the earlier example, this kindling pile burned about ten minutes (obviously I removed the pen and used the sticks instead).
The one thing you don’t want to do is to get a little fire like this going and then put a 3” diameter log on it. It will probably just char and die out and you will have to start over. You want to work your way up to the larger pieces of wood, which is why you want quite a bit of kindling. You would put pieces of wood about the diameter of a dime on this fire, and then once those are burning you could go up to larger wood about the diameter of a quarter, and then to your bigger pieces.
What if you can’t find any large pieces of wood? Collect a LOT of kindling. You can keep a small fire burning all night, it just requires constant attention.
How much wood do you need? I’ve read that a double armload of wood will burn about 40 minutes. That varies with the type of wood, but think about how much wood that is if you need it to burn for eight or ten hours. That’s about 15 armloads of wood. Others say you need a pile that is as long as you are tall and about waist high. Think about the amount of wood that represents. And you may have to collect it in the hour before dark. This isn’t going to a stack of firewood and picking it up. You have to find it.
This is complicated because, in the wild, you don’t necessarily know how much of the wood will burn well; it may not be as dry as you think. So you need to collect more. Some people say collect three times as much as you think you will need. Any way you measure it, you need to collect a lot of wood if you want to be sure you can stay warm all night.
If you have a fixed-blade knife, the larger pieces will burn better if you split them. But as with splitting wood with a pocket knife, don’t try to split anything too large. You don’t want to get the knife jammed into a log. If you need to split a larger log, try splitting off pieces a half inch wide or so around the outside.
To turn a kindling fire into a real fire using larger pieces of wood, you can just scale up the kindling approach. You can build a pyramid of larger wood pieces over the kindling pile. Or you can build a log cabin around and over the kindling pile. The key is to insure that you have adequate airflow.
One way to do this is to put a couple of large logs or even a row of rocks on either side of the kindling pile. Then crisscross logs across these supports, keeping enough space to let air flow around and through the logs. You want some of the logs to be directly over the kindling fire so they are directly ignited by it.
If you read the article about my lost-hiker experience, there is a picture that shows a row of rocks behind the fire. This is important because the rocks will reflect the heat back at you, making the fire more efficient. Any way you do it, an open fire is going to literally send most of the heat up in smoke, so anything you can do to reflect some of that heat back at you will help.
The rocks you see in that picture aren’t very big, and that illustrates an important point about this kind of situation. As I’ve already mentioned, where I was hiking was all deep snow. I would have preferred a larger pile of rocks, but I didn’t have time to hunt through the snow for a better selection before it got dark. So I used what I could find in the immediate vicinity.
Next time, I’ll show you what’s in the fire kits I carry when I go hiking.
Imagine this scenario: You discover you are lost. You barely had time before it got dark to collect firewood, and you’ve got a big pile of it nearby. You have collected a pile of pine branches to put between you and the cold ground. The temperature was about 50 when you started hiking, it’s in the low 40’s now, and expected to drop into the 20’s overnight. You didn’t expect to get lost, so you aren’t really dressed for those temperatures. The only fire tools you have are a Bic lighter and a UST StrikeForce ferrocerium fire starter with a Wetfire tinder in the handle. The Bic is out of fuel because it developed a leak or the button got pressed while it was in your pocket; whichever it was, the butane has evaporated and the lighter is useless.
You successfully used your single piece of Wetfire tinder to light a fire with the StrikeForce. You’ve hiked all afternoon, the last two hours trying to find your way back while in a mild panic. The adrenaline that drove your emergency preparations is wearing off. You’re way past tired, you are exhausted. You lay down beside the fire, and it’s really kind of comfortable, like camping without a tent. Without intending to, you doze off. You wake up shivering two hours later to a black night and a cold fire. Your teeth are chattering. You realize you are in a dangerous situation. You’ve used up your only piece of tinder and you have a very long, very cold night ahead of you. What do you do?
Burn your underwear.
I know that sounds like a lead-in to a lame joke, but I’m not joking. Serious backpackers say things like “cotton is rotten” and “cotton kills”, because cotton loses its insulating properties when wet. But the reality is that a lot of day hikers are walking around in ordinary cotton underwear, either shorts or a T-shirt. And you can use it to start a fire. You want to take it off first, of course.
I tried a piece of fabric from an old pair of cotton underwear. I cut a piece about 1.5” x 4”, kind of ragged like it would be if you cut it with a knife or tore it with your hands. I stretched and pulled on the edges to separate the threads a little so it would light easier. I lit it with sparks from a ferrocerium rod, and it burned about two minutes. That’s long enough to get another fire started. You would want to fold it or wad it so that as much of the edge as possible is exposed, since that is the part that is easiest to light.
This is a specific example, but the general idea is that of making emergency tinder from whatever you have available. Almost any cotton fabric will burn if you fray the ends. I made a case for one of my pocket fire kits out of canvas; the fabric isn’t as easy to light as setting your shorts on fire, but it will burn. In that case, the emergency tinder is right there with everything else. Cotton denim will work as well. A lot of people hike in denim jeans. That is, denim emergency fire starters. Tear away a hem at the bottom and light it. To light denim or canvas, you want to separate some of the threads to make a “fuzz pile” that you can put at the base of a bigger piece.
When I was lost at Brainard Lake, I used up all the tinder I had brought with me. Once that was gone, I tore into my first aid kit and lit the alcohol wipes. They were small and didn’t burn long, but they will start a fire. About any alcohol-impregnated wipe will burn if the alcohol content is high enough. This includes hand sanitizer wipes, as long as they are alcohol-based (not all of them are).
You can also light hand sanitizer from a bottle, as I mentioned last time under “chemical tinder”. It’s hard to light the stuff that is only 62% alcohol. The 70% variety works quite well.
If you have any wax-based lip balm, such as Burt’s Bees (contains beeswax), pinch off some of that and work it into a piece of cotton cloth or a piece of paper (shred the paper to make it easier to light) or into a tissue. The wax will significantly extend the burn time. Some people like lip balm that is based on petroleum jelly; that will work about the same way. The paper or cloth works as a wick and the wax or petroleum jelly is a fuel source. And, yes, ordinary ChapStick brand will work.
Use a knife to shave tiny shavings from a piece of dry wood. You need a good-sized pile to get a fire started, enough to make a wad that will fill your palm. And if there is any wind at all, this may be impractical since you can’t keep the shavings in one place long enough to get them lit. Making and lighting wood shavings is good practice for using a ferrocerium rod; if you can light this, you can light about anything.
For women – cotton tampons. I assume not too many men are carrying these around in their purses, so it’s not applicable to us guys.
Dead pine needles. Hard to light without something such as a facial tissue or cotton ball, but once lit they flare up quickly. They also burn up quickly, so you need a lot of them to start a fire. If you just have a tiny piece of cotton or lint, or a single tissue, pine needles may give you just enough burn time to get the fire going. Of course, if you don’t hike where there are pine trees, you’re out of luck here.
Fatwood, if you can find it. This is pine wood that is saturated in pine resin. You find it in pine stumps and often at the base of a dead pine branch. In the scenario I described earlier, you probably won’t find it in the dark. But if you start before dark, you may be able to cut or break off some pine branches that have fatwood at the base.
If you can find a pine tree where a branch has broken off or there is a fresh scar with pine sap running down, the bark right around it may work. I’ve shaved off tiny pieces of pine bark that is saturated with pitch and been able to light them with a ferrocerium rod. The pine pitch burns hot, although it’s really smoky. But in an emergency, you don’t care about that. This requires the same technique as making a pile of wood shavings, but you need less of it and it’s easier to light. It’s also harder to find. This is really only practical if you have a knife, saw, or multi-tool to dig out the saturated wood.
Other tree bark can be used as tinder. I haven’t tried birch bark, but I’ve read that it is quite effective as tinder. Useful for those who don’t hike in pine forests.
Dead tree leaves. The drier and crispier, the better. The disadvantage here is that the best leaves for tinder are on the ground, where they will tend to pick up moisture from the dirt. But if you can find some really dry leaves, you can light them. Leaves still on the tree are good if they are really dry, or leaves caught in bushes and grass where they aren’t in contact with the ground.
Tree leaves tend to want to smolder rather than burn. I’ve found that the best way to light them is to find some that are curled up; that way when you get them lit, the fire will feed itself. It might seem that you would want to crumble them but I’ve found they are easier to light if you leave them intact. Crumbled leaves don’t seem to get enough air to burn effectively. You want leaves that are dry and brittle enough to crumble, but you don’t want to actually crumble them. If you have to use leaves, you want a pile of them because they don’t burn very long. Make a tinder nest of leaves under a pile of small sticks, light one on the bottom, and let it light the rest of the pile.
The scenario I started this post with might seem improbable. But getting lost is never something you plan for, and the improbable does happen. When I got lost, it was in deep snow and there was limited natural material around. You read of people who didn’t take their backpack because they weren’t going to be gone very long or go very far – and then they got lost. People get lost when inadequately prepared for the conditions. Hunters get lost. People set their backpack under a tree, walk away, and can’t find it again. Cross-country skiers get lost. People even get lost in national parks where there are marked trails – they get off the trail or take a couple of branching trails, and then realize that they don’t know how to get back. Here in Colorado, the rangers in Rocky Mountain National Park perform over 100 search-and-rescue operations each year. That doesn’t even count the mountain rescues that are performed outside the park.
Waterproof match containers do leak if the cap gets loose. Bic lighters do fail. That’s one of the reasons I like having a ferrocerium rod, even with other fire-starting methods; it is inherently waterproof. It’s better to have alternatives and not need them than to need them and not have them. It’s best to carry enough tinder to light a fire a few times, not just once. But in a pinch, there may be alternatives you haven’t thought of and I’ve tried to describe a few here.
Next time I’ll look at the practical aspects of starting a fire.
When you build a fire, you normally have to start with small things that light quickly and easily, and use those to light larger pieces of wood, which then light even larger pieces of wood. It takes significant energy to get a log of any size burning, and a match or lighter just isn’t going to do it. If you try to light a sizable piece of wood with a lighter, say something a couple of inches in diameter, you will find that the lighter gets too hot to hold, and will probably run out of fuel long before the wood ignites.
Tinder is normally something that lights easily but burns relatively quickly. It produces a small flame suitable for igniting larger pieces of wood.
There are lots of kind of tinder, I want to look at a few here.
Natural Tinder
You can use natural tinder such as cattails, dry leaves, pine needles, or other plant material. If you can find it, fatwood shavings are fairly easy to light and will burn long enough to get something larger going. But when I had my lost-hiker experience (actually a lost-snowshoer experience), I was in deep snow and there wasn’t much natural tinder available. I found some dry grass under the tree where I spent the night, but aside from that, all I had was what I brought with me.
In my case, I was near a stream and there were probably cattails near the water. But it was down a steep incline and in deep snow. Not worth the risk, especially in the dark.
Tinder you carry with you
Keeping in mind that you are probably not going to have much time to prepare to spend the night, you will want to carry tinder with you. You don’t want to be looking for dry leaves or fatwood in the snow as darkness is falling.
When I was lost, I had several pieces of wax paper that I used; it works well although it doesn’t burn very long. Cotton balls and dryer lint work as well and are trivially easy to light, but they burn up in a few seconds.
Many people swear by cotton balls with petroleum jelly worked into them. I’ve tried these, they work and they burn a long time. But they are messy and I’d be concerned that they aren’t really waterproof. The petroleum jelly is waterproof, but it’s not a solid and you don’t know how well it has saturated the cotton fibers. Plus, although cotton balls light very easily, cotton soaked in petroleum jelly is a little harder to light.
Paraffin-based tinder
I still want to carry dry tinder rather than something based on petroleum jelly. Paraffin, like petroleum jelly, is a petroleum product, but it is solid at room temperature. It makes a dense fuel. The key to getting a long burn time with compact tinder is the amount of fuel you can get it to absorb. I’ve done a lot of experimenting with various types of tinder since my experience, and I’ve settled on three that I really like.
The first is jute twine (you can get it at Walmart or your local hardware store). Braid three strands of it together, dip in melted paraffin, let it dry, and you’ve got waterproof tinder that lights easily and will start a fire. To use it with a ferrocerium rod, fray one end to expose the individual fibers; this provides a “fuzzy” surface that will catch a spark. A 2” piece will burn for about 2 minutes.
The second thing I like is Coghlan’s Fire Sticks. These are a mixture of wax and sawdust that will burn for a few minutes and produce a good-sized flame. They are a little harder to light, you need to either shave some off or break the stick to expose a ragged edge. A quarter of a stick will produce a usable flame for 3-4 minutes. My only objections to these are that they are a little larger than I like, and they are somewhat brittle; if you carry them around in your pack or pocket for a while, you may find that they have crumbled when you need them. They will still work, though, as long as it isn’t so windy that they blow away. I carry one of these in my pack, but I don’t carry one in my pocket.
I really like jute twine, but I wanted it to burn a little longer. The fuel for the jute twine is the paraffin, the twine works like a wick and absorbs the paraffin. I wanted a way to get more paraffin into the jute twine, something like a tiny candle, without making it too large for a pocket. I tried making little cardboard tubes and paper envelopes and filling them with wax, but I didn’t like the results. I tried a few different things and finally hit on something that is so simple I kicked myself for not thinking of it sooner.
To make the long-burning tinder, you start with a piece of jute twine about 2 ½” long. You also cut a piece of facial tissue or toilet paper about 2” x 3”. One square of toilet paper makes two of these. You roll the tissue around the jute twine and put a couple of tiny drops of glue on the end of the roll to hold it in place. Once the glue is dry, dip the assembly into melted paraffin long enough for the wax to saturate the paper.
The extra wax absorbed by the paper makes the tinder piece burn significantly longer; about 4 minutes. This is enough to light even a stubborn piece of kindling.
Jute twine and tissue paper, soaked in paraffin
There are other things I’ve experimented with such as threading jute twine through the holes in a piece of corrugated cardboard and dipping it in wax. About any combination of jute and paraffin will work. But nothing I’ve found beats the jute twine and tissue combination for a waterproof, compact, long-burning tinder source.
I have tested both braided jute twine and the twine/tissue tinder pieces by soaking them in water and then lighting them. I even used a weight to keep the tinder at the bottom of a container of water, to simulate what might happen if you fell in a river and had to wade out. As long as you saturate the piece with wax, it will be waterproof.
You can also saturate the jute twine in hardened pine resin, but I don’t find much advantage to it. I think it burns hotter, but it’s very smoky and a little brittle when dry.
I’ve used paraffin and wax here interchangeably. Some people swear by beeswax. I’ve tried both; I don’t see any advantage to beeswax other than the fact that it smells pleasant while it’s burning. The beeswax I’ve used has a lower melting point than grocery-store paraffin, so it may melt in your pocket or pack on a hot day. However, if you look up the melting point of beeswax, it is comparable to paraffin so the beeswax I used may be atypical.
You can purchase tinders such as Baddest Bee, Zippo (and other) waxed tinder sticks, Wetfire tinder from Ultimate Survival Technologies, and Coghlan’s Emergency Tinder. All of those will work, although some are going to be more waterproof than others. I haven’t tried them all, but I have tried a few of them. Some of them have exposed cotton fibers at the ends; they light easier than paraffin-soaked jute or cotton balls with petroleum jelly. If you carry that type, I recommend putting them into a waterproof match holder, or putting a few in a small balloon and tying the end. Either will protect them from water.
Chemical Tinder
In the course of my experimenting, I hit on the idea of using lighter fluid as tinder. I purchased one of those “matches” that has a piece of cotton soaked in lighter fluid that you light by striking a small ferrocerium rod. It occurred to me that, while that tiny piece of cotton won’t hold much lighter fluid, a brass container will.
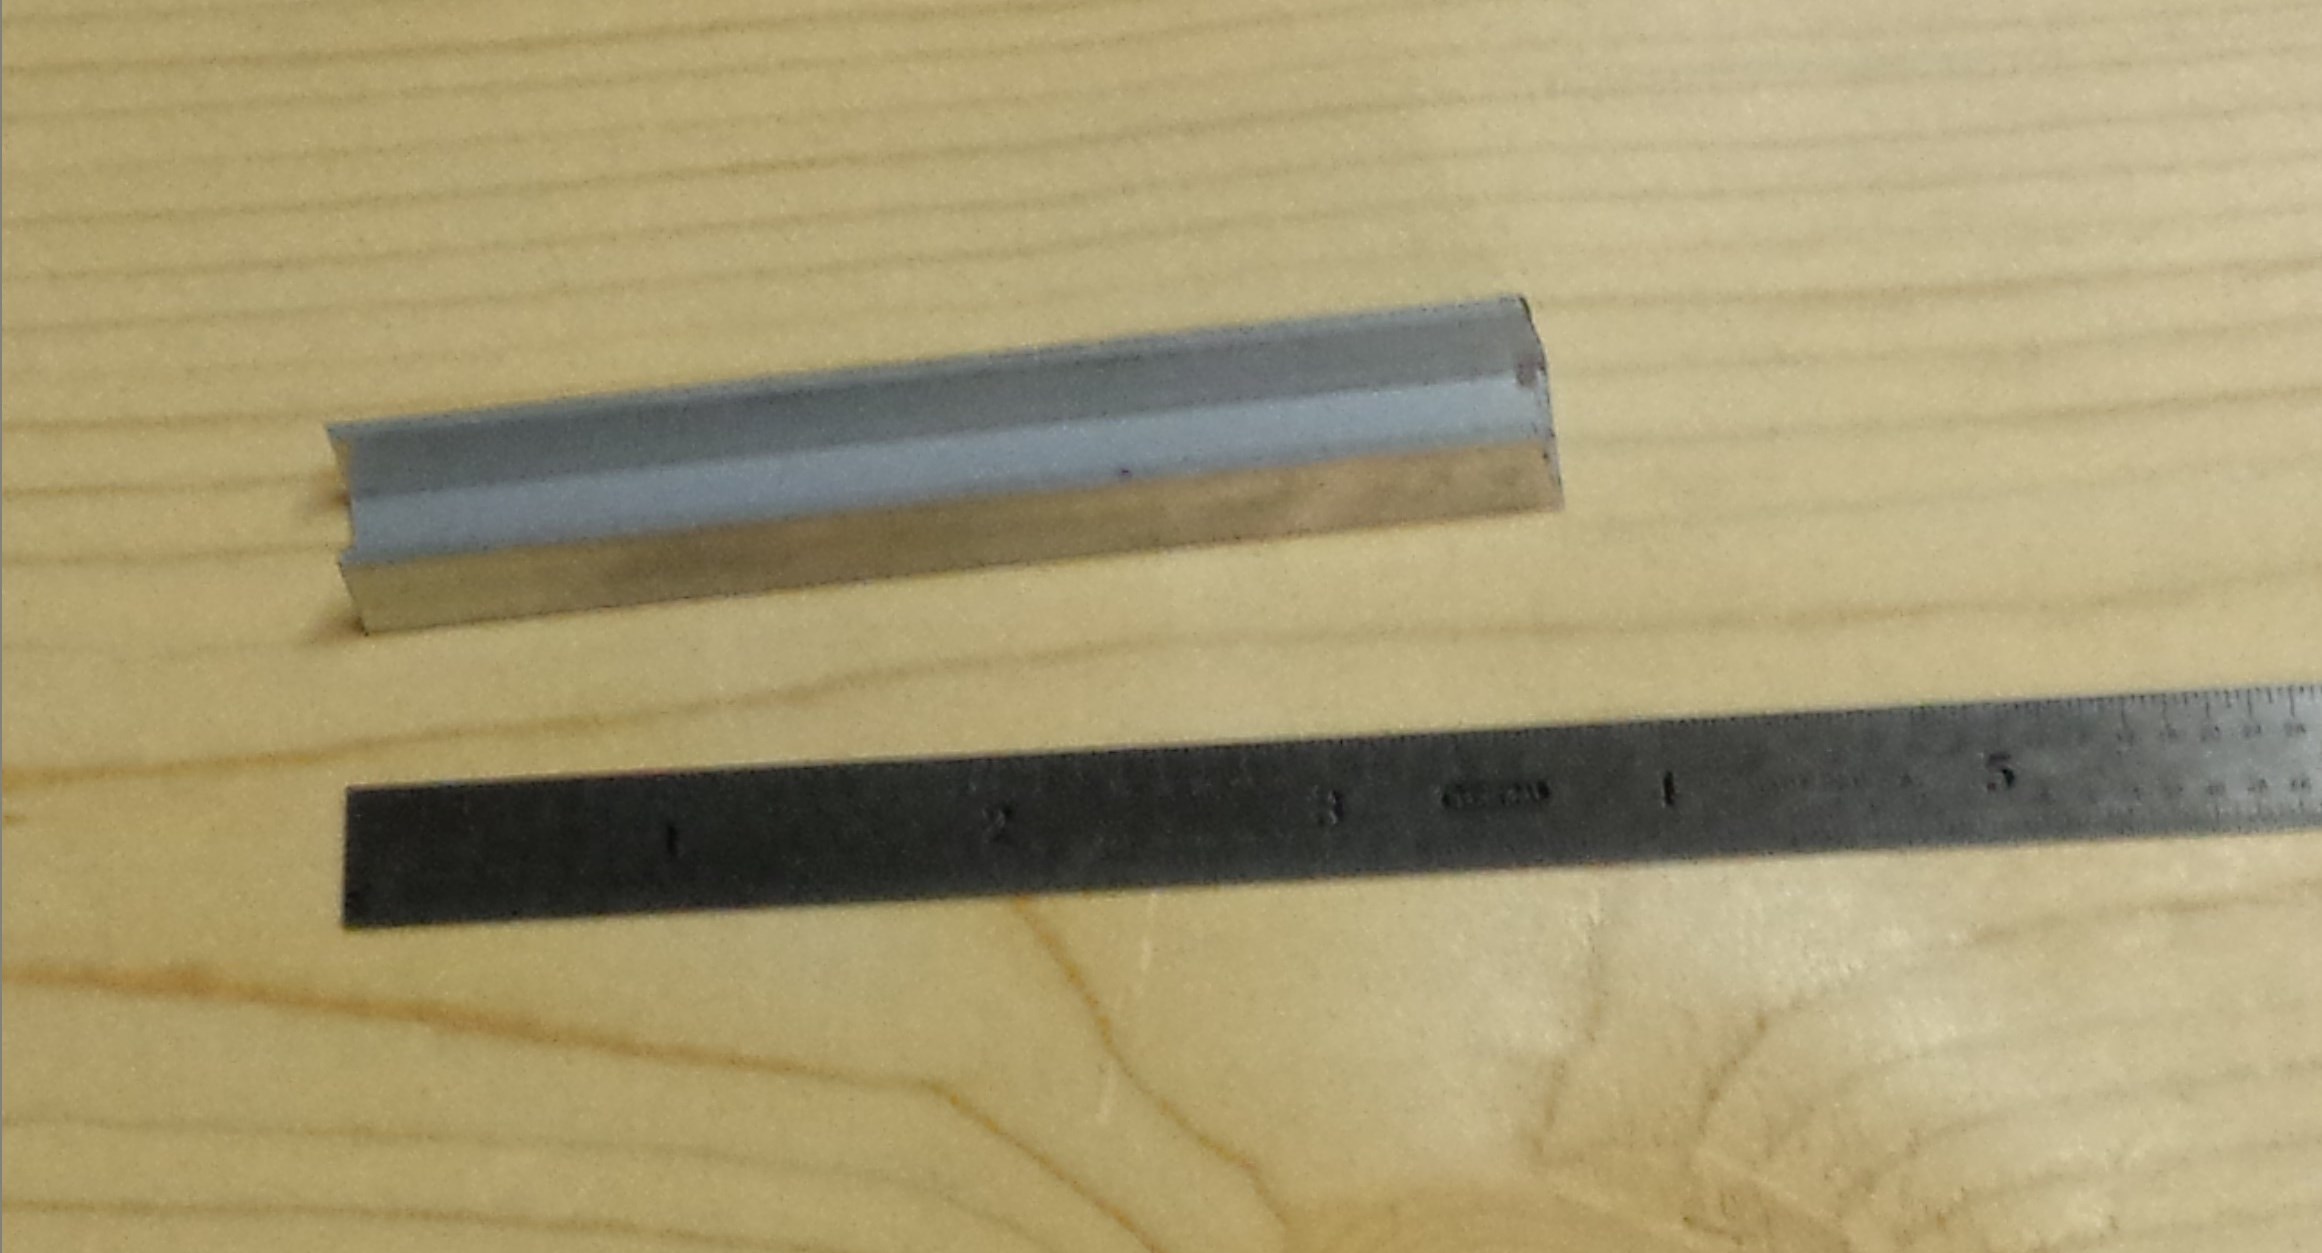
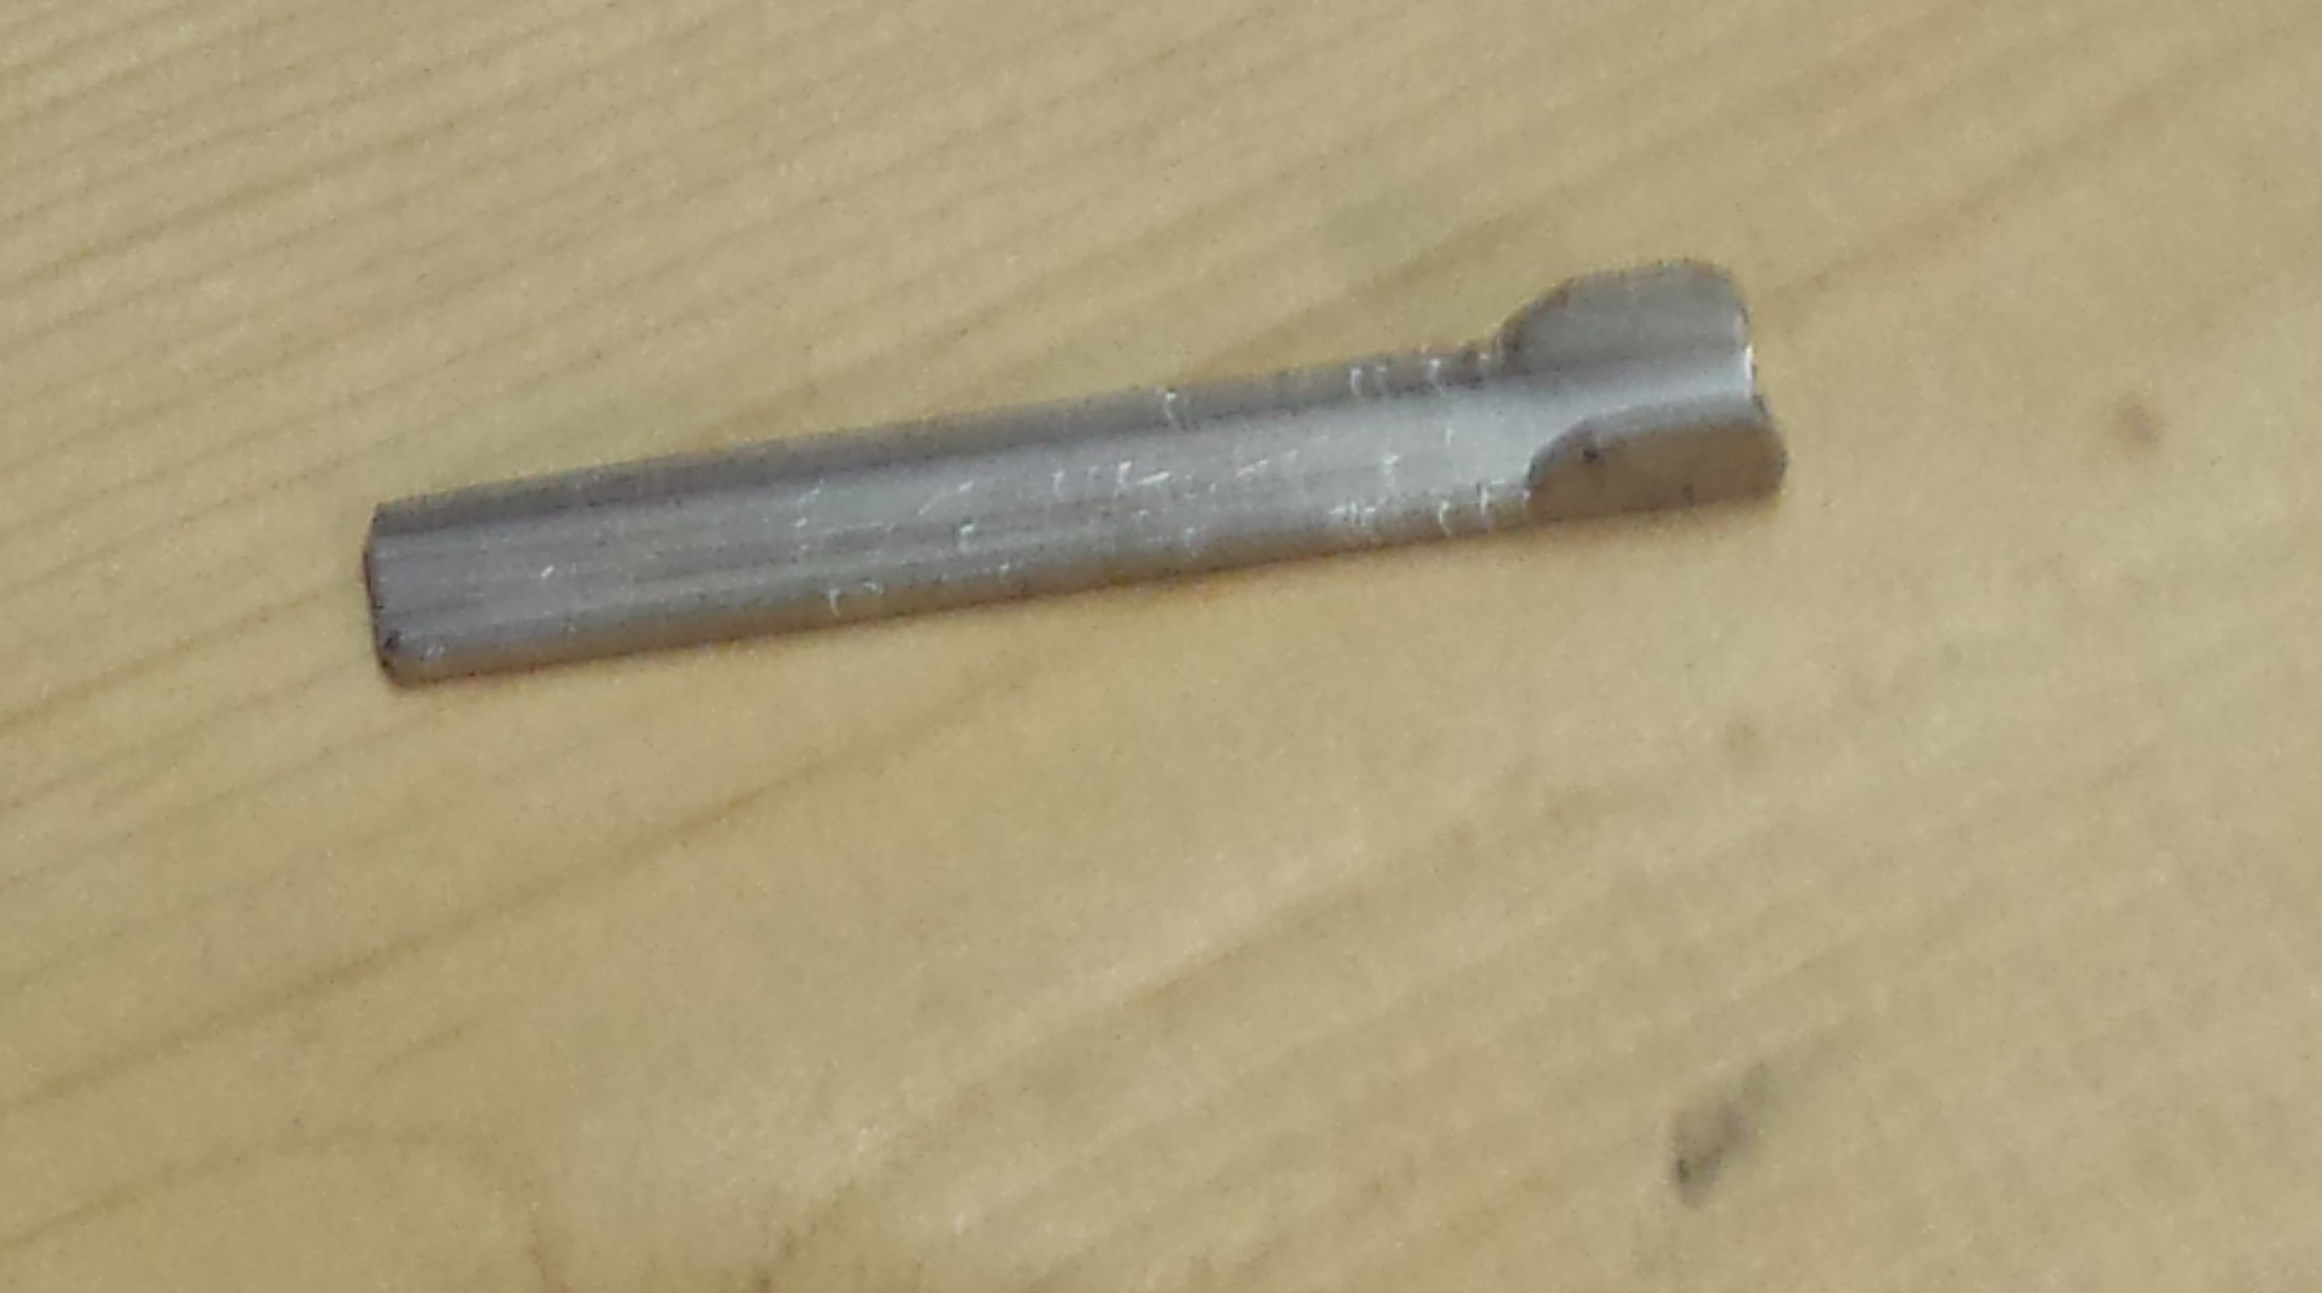
I made a brass container by starting with brass tubing that you can get at your local hardware store. I soldered an 8-32 brass nut in one end and crimped the other end closed, soldering it to seal it. I then used an 8-32 screw with a knurled head and an O-ring.
To use it, you just remove the screw, hold a small piece of wood or rolled-up paper over the hole, and invert the tube so that the fluid soaks into the wood/paper. Replace the screw, put the soaked tinder in your kindling pile and light it. You want the soaked tinder to be as vertical as possible so the flame burns up as the lighter fluid is burned off.
Brass tube to hold lighter fluid
The obvious question is why go to all the trouble to make a brass container? Why not just use a plastic bottle? The reason is that lighter fluid is essentially naphtha and it will evaporate through the walls of some plastic bottles. I tried a small bottle that is made of (I think) PET plastic. Over the course of a week or so, the lighter fluid evaporated out. So if you want to do this and use a plastic bottle, try it first or you may find it empty when you need it most. And be sure the cap of the bottle has a good seal.
You could also store lighter fluid in one of those waterproof aluminum pill bottles. I like the brass tube because if you drop it while the cap is off, you will lose a few drops out of the hole instead of the entire thing. Although the pill bottle has the advantage that you can just take the top off and dip whatever you want to light right into the fluid.
Other chemical tinders include Sterno and hand sanitizer. Smear some Sterno on a piece of wood or piece of paper and it will burn. Hand sanitizer that is 70% alcohol works also. It’s a little harder to light than Sterno, but it works.
In my pack, I carry some Hexamine fuel tablets, such as those made by Coghlan’s and Esbit. They are hard to light with a ferrocerium rod, but if you crush them to powder with a rock or the side of a knife, they light without too much difficulty. The nice thing is that they burn for a very long time since they are intended to boil water. If you are carrying a small stove that uses these tablets, they make a good backup tinder if you use up everything else. You could also crush one of the tablets and carry the powder in a small plastic bottle. Pour out a little pile, light it, and start your fire.
UST Strikeforce
Ultimate Survival makes a StrikeForce fire starter, which is a ferrocerium rod and striker in a plastic housing, with room for a wetfire tinder cube. This has everything you need to start a fire in one plastic housing, although you only have room for one wetfire cube. This isn’t really tinder, it’s a complete package with one tinder cube, but it’s worth mentioning.
Magnesium
As I mentioned in part 1, you see a lot of recommendations for the magnesium blocks with an attached ferrocerium rod. I had one of these at Brainard lake. I don’t carry one now. The concept is a good one; like the UST StrikeForce, your ignition source and tinder are together in one block. All you need is a knife to make it work. The problem is that it’s some effort to shave off the magnesium; the instructions say you need a pile about the size of a quarter, and I would say you need at least that much if not more.
The second issue I have with magnesium is that it won’t work if there is much wind because the magnesium shavings won’t stay put.
In its favor, magnesium does work very well as tinder under the right conditions. Once you get it lit, it burns incredibly hot. You essentially have a pile of red-hot semi-molten metal. Stick the end of a piece of wood into that and it absolutely will catch fire. Magnesium doesn’t burn very long, but it doesn’t take very long if you have the wood in direct contact with it. I tried this with a piece of wood that was about the diameter of a dime; it caught fire within seconds.
If you decide to carry magnesium, I wouldn’t carry the bar of magnesium. Instead, use a hacksaw or file to remove enough shavings from the bar to fill a small bottle. Carry the bottle with you. When you need to start a fire, pour a small pile of that out and light it. It’s much easier than trying to carve the magnesium under adverse conditions. If you want enough magnesium for a couple of different fire kits, or to experiment with, you can buy magnesium rods and blocks from Amazon or Ebay.
I’ve experimented with magnesium quite a bit; an acquaintance was machining some magnesium and gave me the scraps and shavings that were left over. So I had a lot of material to work with. I have a bottle of magnesium shavings, but I decided I like lighter fluid better; in my opinion, it’s more versatile.
In Part 1, I described the four components of an emergency fire: an ignition source, tinder, kindling, and all-night fuel.
The ignition source is what provides sufficient heat to ignite the tinder. There are a number of ways to do this; you can do it with a magnifying glass if you have sufficient sunlight, you can use a battery and steel wool if the battery isn’t dead, you can make a fire bow if you are really industrious and have the time.
I want to look at things you might take with you that are practical to carry and in my opinion, more useful than any of those things. I’m going to limit this to things I’ve tried.
The first and most obvious thing is a simple Bic lighter. A lot of people swear by these. They are cheap, simple, lightweight, small, and easy to operate. They have a few drawbacks; they can leak and the fluid will evaporate. If the thumb valve gets depressed in your pocket or pack, it will empty the lighter very quickly. They have mechanical parts that can break. In cold temperatures the butane won’t vaporize.
These drawbacks can be overcome; the easiest way is just to carry two of them. I have one in my pack and I put a small O-ring around the lighter, under the valve, so it doesn’t get pressed while I’m carrying it around. You can handle the low temperature problem by warming the lighter next to your body before you use it.
If you are going to carry just one ignition source, a butane lighter would be a good choice.
The second ignition source is matches. Since you want matches that will operate if you fall in a river, you will want waterproof matches. You can either buy (or make) waterproof matches, or you can put normal matches in a waterproof container.
If you aren’t using strike-anywhere matches, you will need a striker. I purchased a repair kit for the Exotac Matchcap. It has several small striker strips with adhesive on the back. I just stuck one on the cap of a waterproof match container, and put a second one on a piece of paper that I folded and slipped into the container with the matches. To keep the matches from sliding around and wearing on each other, I put a small piece of cotton under the cap. It has the added advantage of being a source of tinder.
You can purchase waterproof matches, or even waterproof storm matches that burn longer. I made some myself by wrapping about 6” of cotton thread around a match right behind the head. It makes about a half inch of cotton behind the head. If you dip the entire match quickly into melted wax, it will coat the head and soak into the cotton, making a longer burning waterproof match.
The final ignition source is a ferro cerium rod, sometimes called a flint striker (even though it isn’t really flint) or a firesteel . This is a rod made of iron, cerium, and some other rare earth elements. When you scrape it with a knife blade or other hard, edged metal blade, you scrape off some of the material and ignite it. The sparks are about 3000 degrees F, but they aren’t very large particles so they are only going to ignite something that easily lights. Something like a cotton ball.
I like the ferro rod because it’s waterproof, small, and versatile. It has no moving parts. The disadvantage is that it takes a little practice to use effectively and it won’t easily light a piece of paper or a piece of wood. It produces sparks, not an open flame.
The ferro rod is available with plastic handles and you often see it used to “throw” sparks at whatever you are trying to light. I’ve found it most effective to set the tip of the rod on a solid surface and scrape the sparks at whatever you are trying to light. It lets you aim the sparks more effectively.
You will find debates on the Internet about which brand of Ferrocerium rod is best, which produces the most sparks, which works best. I found that what matters is the size of the rod and quality of the striker. The inexpensive Coghlan’s rods or no-name rods from China seem to work about as well as the Swedish Firesteel rods. The magic is in the striker, not the rod.
For the rod, 5/16” diameter seems to be a good compromise. I haven’t tried a ½” rod, which would probably work better but they tend to be a lot longer and harder to carry around. The best striker I’ve found is either a utility knife or the edge of a scissors blade. Both are very hard steel with sharp edges, which is what you need.
I bought some mini utility knives and replacement blades. Using the knife on the rod will destroy the blade (you are using metal to scrape off metal, after all) but the blades are reversible and disposable.
For the scissors blade, I got a quality pair of small scissors, separated the two halves, removed the handles and broke off the blade to shorten it. I wrapped the “handle” end in bright orange duct tape to make it easy to see and to hold. You can use either side of the blade (the cutting edge or the back edge). I think the cutting edge works a little better, but it does tear up the rod more. But I consider these to be emergency items; if I have to use it, I’ll throw it away and replace it when I get home.
Ferrocerium rods are a bit brittle. They don’t bend very well and they can splinter when dropped. If you don’t mind a slightly larger version, you can modify it as follows to make it more durable and easier to use:
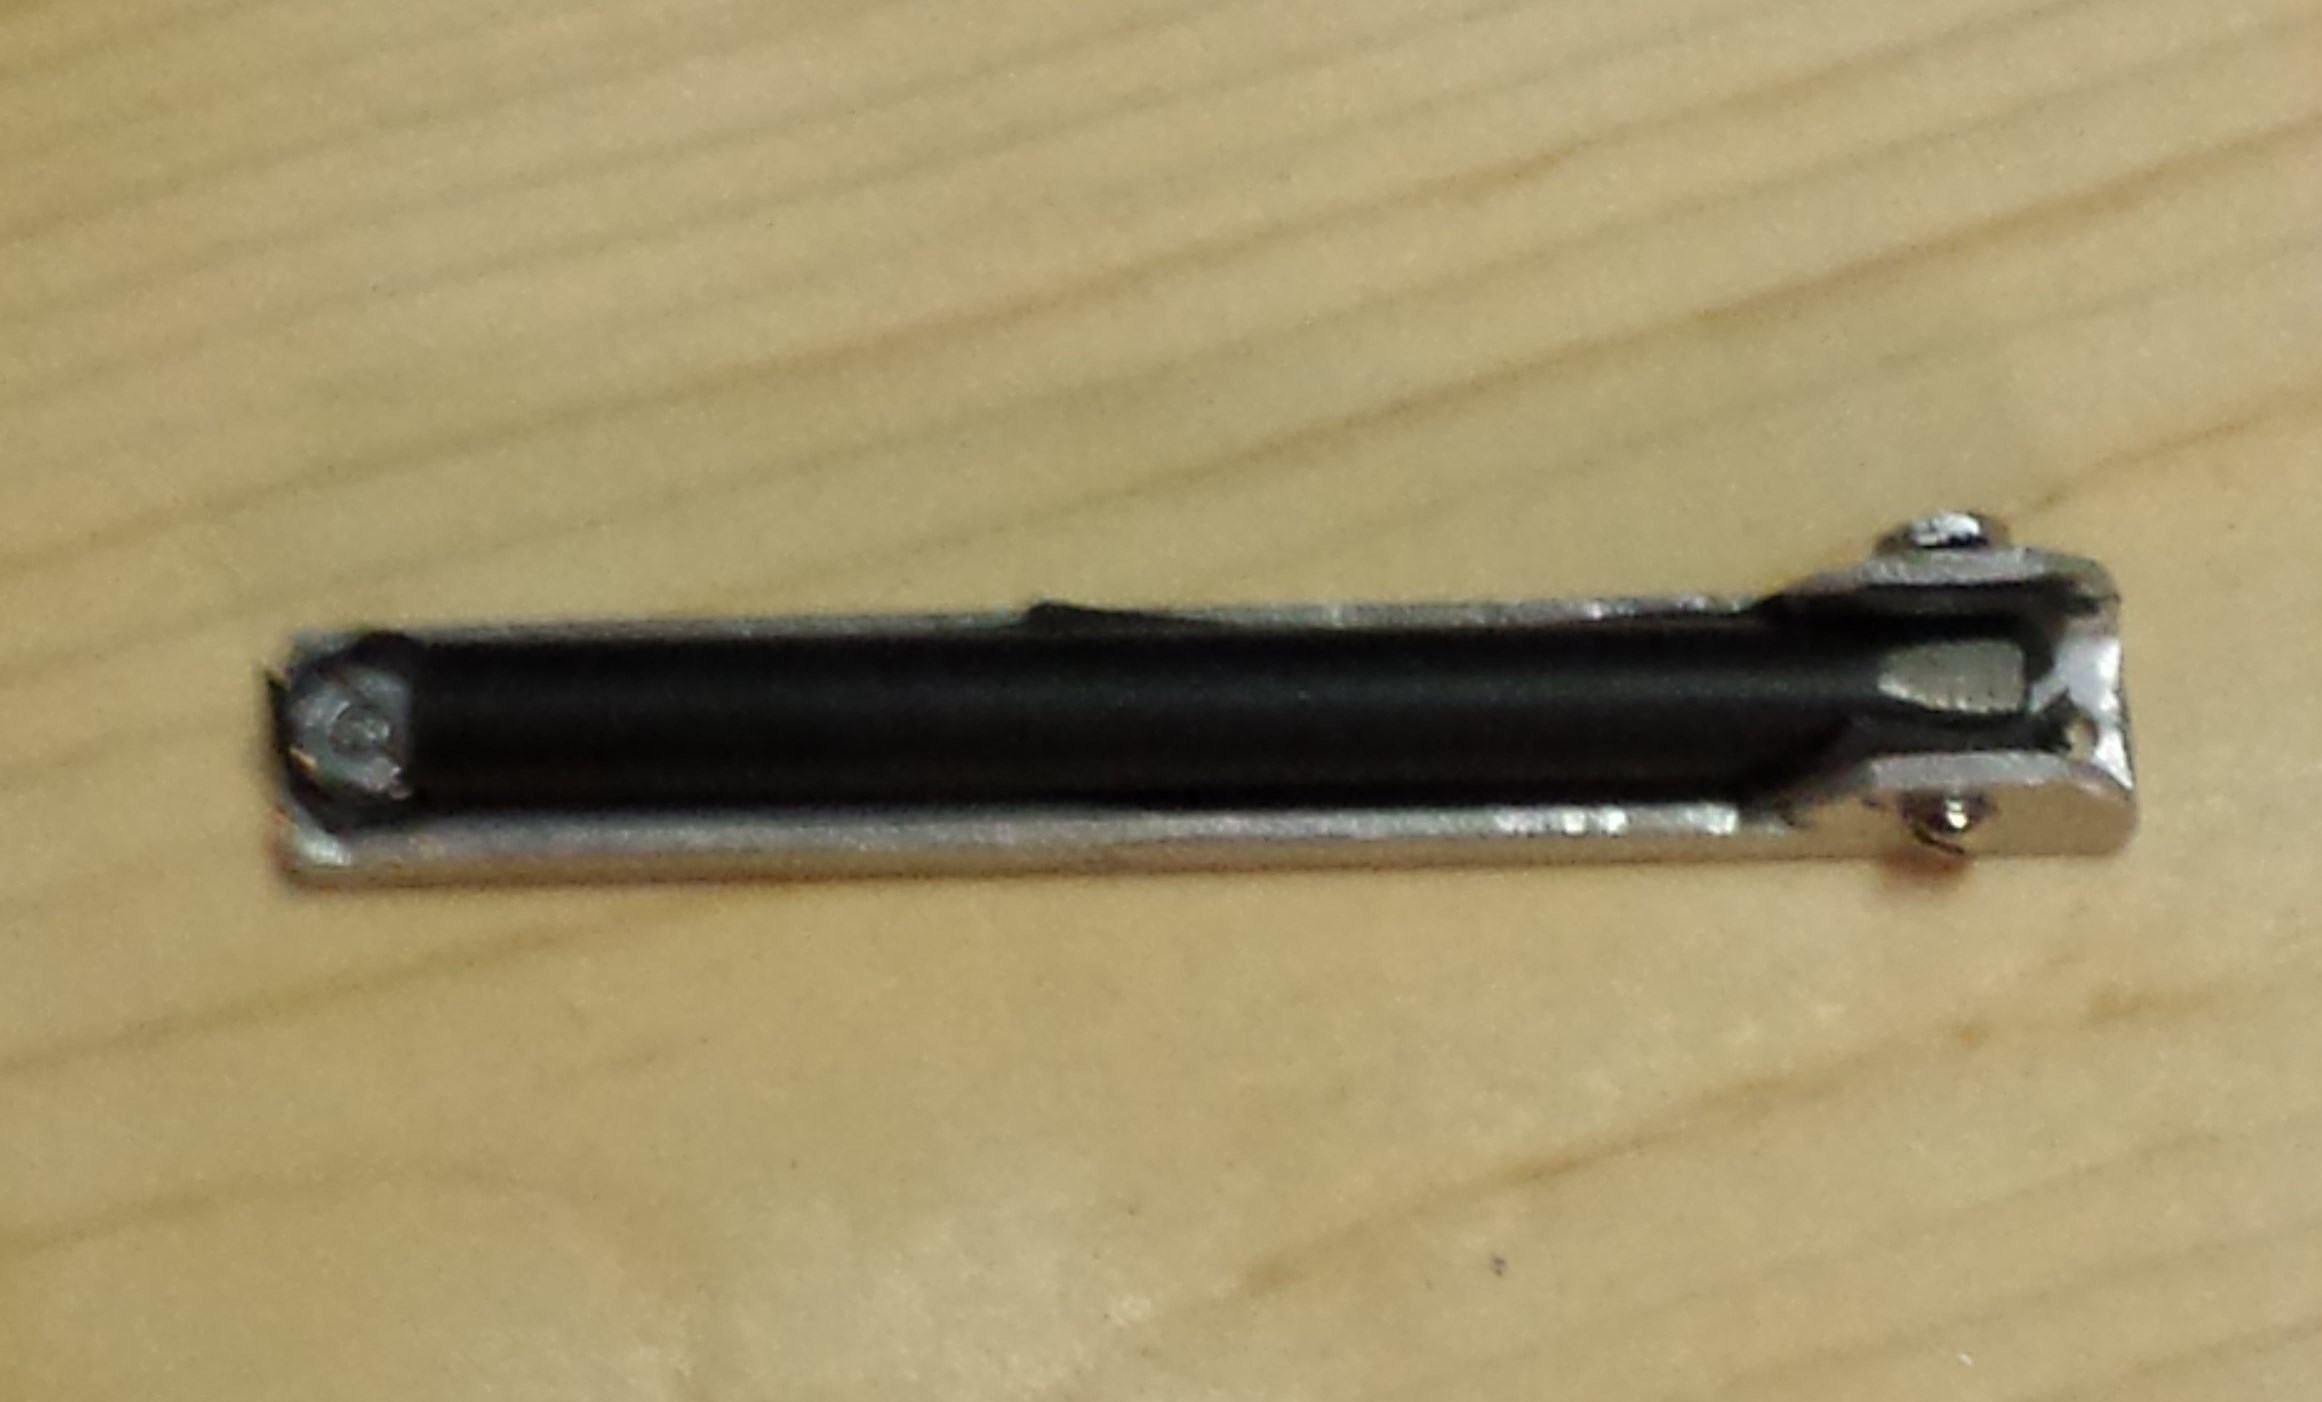
I use a 5/16” diameter rod that is drilled for a lanyard. I cut a piece of 3/8” x 3/8” x 1/16” aluminum C channel to about ½” longer than the rod.
I then cut the sides off from one end, leaving about .7” at one end, and leaving about 1/16” of the sides to stiffen the bracket.
The next step is to cut a piece of inner tube about the same length as the bracket. I use this just to provide some padding for the rod; it’s really optional. You then drill a hole through the sides of the bracket so you can run a 4-40 screw through one side of the bracket, the rod, and the other side of the bracket. You drill a hole at the bottom of the bracket so you can add a support for the bottom of the rod.
Completed bracket assembled with rod
You can make the entire thing a little more compact by using a countersink for the holes in the top and bottom, and by threading the aluminum on the top instead of using a nut (use thread locker since there isn’t much thread).
Drill a hole in the top for a lanyard, if you want one.
File all the edges round so they don’t poke holes in things or cut your fingers.
When you are done, you will have about ¼” of the aluminum extending beyond the bottom end of the rod. You can rest that on a hard surface (rock, piece of wood) to steady the rod while you are shaving sparks off of it. It gives you much better control and makes it easier to light things.
I have found that pushing harder with the scraper blade and going a little slower works better than scraping as fast as possible.
I’m going to mention one thing that I haven’t actually tried, but shouldn’t need to: an emergency flare. Some people carry these. You can get flares that burn for a short time or flares for roadside use that burn longer.
I doubt many people carry flares when they are hiking. But if you do have one, they will produce a hot flame that will start a fire. If you keep flares in your car, they could be used to start a fire if you were stranded in the winter on a snowy road.
In March of 2015, I spent an unplanned night at Brainard Lake in Colorado. I got lost while hiking at 10,000 feet altitude and in 12″ to 18″ of snow. You can read about it here: http://www.equipped.org/032015survive.htm.
I didn’t go on a three-day backpacking trip and get lost. That would have actually been better than what happened because I’d have been prepared with food, a tent, and other necessities. Instead, I did what many lost hikers do – I got lost on a short hike. I planned to be away from my car for a couple of hours, not 24 hours.
Since that incident, I’ve spent a lot of time looking at what I want to do differently. I don’t plan to go on short hikes with the ability to sustain myself in comfort for three days – it would make hiking so tedious that I would never want to do it. I want to be able to spend an unexpected night in the cold without danger of dying or frostbite. If you are carrying an arctic-rated sleeping bag and tent, with a selection of five MREs and an alcohol stove to cook them over, you probably don’t even need to think about additional shelter or a fire.
If you read through the article about my experience, the one thing that I had most difficulty with was keeping a fire going. So I have spent a lot of time experimenting with various things to make that easier. I want to start with that subject first.
Many of the articles that you read about this topic seem to gloss over things; you get the impression that the writers never actually try the things they recommend. I can’t count the number of times I’ve read that you should carry a fire starter that uses a magnesium bar and a Ferro cerium rod. I had one of those on my adventure, and I don’t plan to carry one in the future. I’ll go into that in more detail in a later post. But the important thing is that I’ll be recommending things that I have tried and that I know will work.
To start out this first post, I want to give you a slightly different view of keeping warm with a fire. You see a lot of Internet pseudo-knowledge that tells you to have three ways to make a fire or five ways to make a fire. If you look closely at what is really recommended, it isn’t anything I’d want to depend on in an emergency. It isn’t a contest to see how many fire starting techniques you have in your pocket, it’s a contest against cold.
The thing about getting lost is that you usually realize you are going to be spending the night an hour or maybe two hours before nightfall. Until then, you are hoping you can find your way back. So any kind of shelter or fire-building method that is going to take you three hours is just not going to happen.
I decided that I was spending the night when the shadows started getting long and It started getting chilly enough that I put back on the fleece I had taken off. At that point, there isn’t time for snow caves or complicated wiki huts. You need simple and fast for the shelter and the fire. Remember, you are going to be collecting firewood and enough firewood to last all night is going to take a while.
Making a fire in the woods requires four basic components. You need an ignition source, tinder, kindling, and you need enough fuel to make the fire last all night. In some cases, the components might overlap; if you have a butane lighter, the ignition source and tinder could be considered self-contained in the lighter. The ignition source is the spark wheel and the tinder is the butane fuel. Similarly, if you can’t find larger wood for fuel, you might gather enough kindling to make a small fire last all night, so your kindling and all-night fuel are the same in that case.
The important thing about making a fire to keep yourself warm is not how many ways you have to theoretically start a fire. The important thing is whether you can start a fire on short notice (as dark is falling) under whatever conditions you may reasonably encounter on your hikes. If you routinely avoid hiking when the weather forecast is for blizzard conditions, you may not need to carry quite the same things as someone who hikes in any and every condition imaginable. But if you hike across streams, as I often do in the mountains, you probably want a way to start a fire if you fall into a stream. That snowmelt water is really cold in the spring. But that means you need something waterproof.
To illustrate my point, the magnesium blocks with an attached ferro cerium rod do work, if you have the time to shave off a pile of magnesium from the block. But in windy conditions, keeping that pile of magnesium in one place so you can light it is problematic. You either need a good windbreak, or you need a different way to start the fire.
In my next post, I’ll look at ignition sources. In the meantime, add whatever comments you think appropriate. I’ll delete any comments that are deliberately provocative or insulting to other posters. Keep it civil.